How to Protect Your Art from Light Damage
Have you ever wandered into a gallery, stood a little too long in front of a painting only to be whisked into the “private gallery” where you were offered a comfy seat and an adult beverage?

Soon the painting you were admiring is brought in and set on a rail against a white wall. Then the show begins.
Your sales person stands behind you, fingertips resting on a dimmer switch, which is being slowly–oh so slowly–lowered until only the faintest light remains. As your eyes adjust, you feel the pull of some otherworldly spiritual glow emanating from within the painting.
You hold your breath. What’s happening? Is the painting…ALIVE?!
Eh, well, actually, the warm hued colors the artist glazed in areas–that’s alive. Alive-ish. OK, not alive, just reflecting the soft, warm light of the dimming bulbs.
Sorry, did I ruin it for you?
Honestly, good on you if you believe it’s alive; you’re not jaded. In fact, go ahead and skip down to the lighting tips and tricks part. Or skip all of this and just install dimmer switches because, whether you own art or not, dimmer switches are magic. Basically, fairy dust. Everything looks better under the influence of a good working dimmer switch. Especially crow’s feet. Just saying.
Sunlight : an obsession
Since the beginning of time, artist studios have been designed around steady north-facing cave entrances and, later, windows in order to harness the most constant natural light source. (OK, don’t quote me on the cave thing. I mean, it makes sense and all but, by most accounts, our earliest ancestors were busy trying not to get eaten by dinosaurs and so didn’t make gallery shows a priority. Weird, I know.)
And, it’s not only artists who obsess over lighting. We curators can spend days, sometimes weeks, adjusting and tweaking fixtures and bulbs to achieve the best possible look and feel for a show.
But as important as light is to the creation and enjoyment of art, it can also physically damage and destroy the objects we love. So, to help you all properly light, protect, and preserve your collections, I gathered the experts and came up with the following tips, tricks, and strategies to not only show off your art but keep it intact for years to come.

Notes from the insiders: TIPS AND TRICKS
Gallerist, Linda Cook, of David Cook Galleries in Denver, works with historic art and textiles. I asked Linda what she most frequently sees as the biggest lighting issues in collectors’ homes.
“The main thing I see are ceiling fixtures mounted too close to the walls,” she said. “When you do that, the light casts a shadow on the art usually from the frame. In a space that has a nine-foot ceiling, I typically suggest having the fixtures three feet from the wall. If you are limited by the width of the ceiling, place fixtures to the side so you can angle the lights at the art.”

When it comes to fixtures, Linda suggests finding the least obtrusive ones with dimmer switches. She also suggests over-doing the lighting. “I have yet to see any house with too much lighting for art. It’s easier to remove bulbs or use lower wattage bulbs than try to add more fixtures after the fact. And having more options will allow you to overlay the light.”
Overlaying light is key to bringing out the nuances of any work of art, but as Linda suggests, it requires more fixtures. The idea is to spotlight or pop an aspect of a painting and then add a flood light or two to illuminate the entire work. “The goal,” she said, “is to light the art so it appears to float on the wall.”
Creating the day you want
You may not be able to get that idiot in the ’74 Pinto doing 45 mph in the left lane of the interstate to move out of your ever-loving way, but you can create the perfectly lit day you want to live under. I know, sounds like some TwilightZone malarky, but it’s true.
Today’s LED lights come in an overwhelming spectrum of colors, tones, and intensities and are the key to brightening your mood and making your art look incredible. To figure out what bulbs are best, I checked in with landscape artist Len Chmiel. Len is renowned for translating his small on-the-spot paintings created outdoors, in natural light, into gorgeous, poetically subtle statements on a grand scale in the studio.
I’ve been to Len’s studio a few times and always loved the huge north-facing window; the light was warm and calming. Recalling the light in Len’s studio, got me wondering if the light a picture was created by–whether outside or in the studio–makes a difference when determining the best lighting in a collector’s home. And, if so, what kind of lights should the collector consider for the optimal effect?
“I believe paintings do show better in natural light,” Len said, but added that, even though he has a huge north light window in his studio, these days he paints under artificial lights.
“I’ve covered the window up in favor of 5,000-degree kelvin florescent lights and one 4500-degree LED flood light,” he said.
Wait—what? Florescent lights in an artist’s studio? Blasphemy!!
“Natural light varies throughout the day and makes the painting look different with each variation,” Len told me. “In the days before artificial light, north light was the most reliably consistent. Not anymore. Took me years of thinking about that—this is the fourth iteration of my studio lighting and the most successful once I realized I needed to cover the north light window.”
OK, fine, I get: artists can now create the exact replication of the sun they need to work day or night. Essentially, they can make their own highway with not one single solitary poky Pinto to slow them down.
But, if that’s the case, what’s the key to buying the right bulbs for showing off your art?
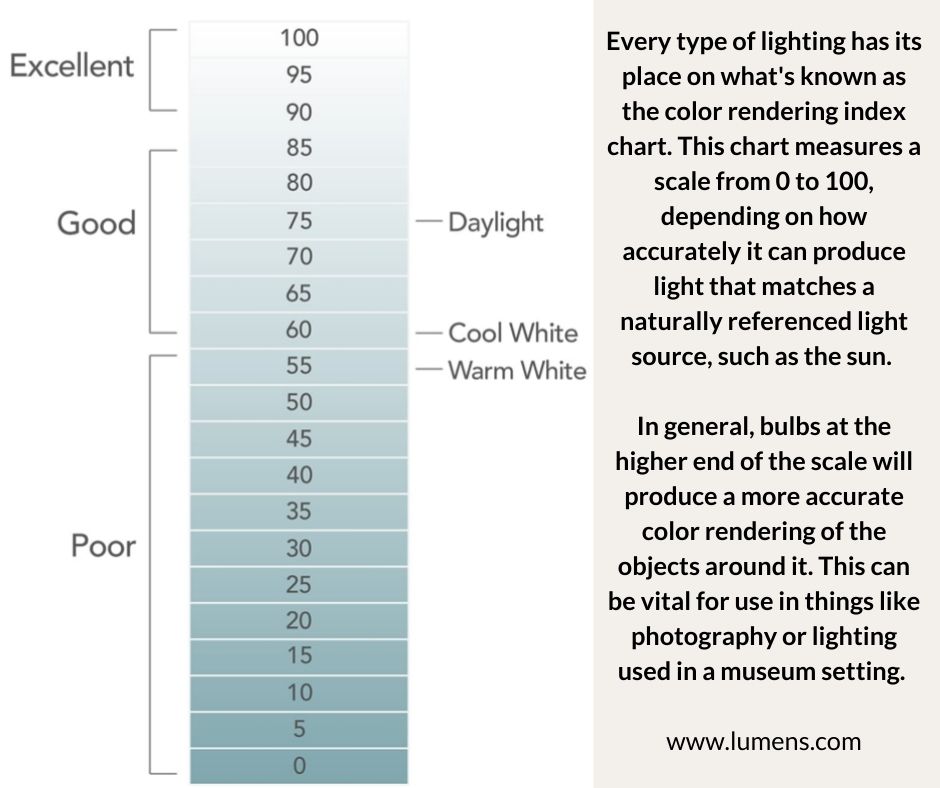
“With artificial lights, a CRI (color rendering index) in the high nineties is very important,” Len said. “Very high quality (and expensive) LEDs are best, after that high quality fluorescents that are—you guessed it—expensive. Whatever degree kelvin you pick, the higher the temperature and CRI the better. Fiber optic lighting is the very best but that’s still not generally available and it’s pricey, last I checked.”
For more about Len, check out his book, An Authentic Nature, that I published for him in 2011.
Sun damage prevention
It’s true: the sun is hard on your skin but even harder on works of art. The mediums that tend to suffer the most from sun damage are works on paper—prints, photographs, and watercolors—while oils, acrylics on canvas, and pastels hold up much better to natural light.
According to master printmaker, Leon Loughridge, dyes used in older works are the most susceptible to rapid fading. “Japanese prints pre-1867 were printed with organic dyes,” he explained, “and should never be hung in bright light or under fluorescent lighting.”
By the 1890’s, printmakers had switched over to pigment-based inks and most contemporary prints are light stable because of better quality pigments, but Leon warns collectors that there are products in use that are not lightfast. “When in doubt, the safest thing to do is hang color prints in low light under UV glazing.”
As an aside, another thing to consider when buying works on paper is what kind of paper was used in the process. Wood pulp-based paper will yellow over time as the wood naturally deteriorates. Cotton fiber paper is much more stable and can withstand fluctuations in temperature and humidity. I’ll return to prints in a future blog; it’s one of my favorite art forms to collect. To learn more about Leon, check out this video.

And then there are photographs

“Photos and watercolors,” said Denver Art Museum curator of photography, Eric Paddock, “are susceptible to fading and color shifting when they get too much light. They never recover from that.”
In museums lighting specs are more restrictive than most people want at home, mainly because houses have windows and museum galleries don’t.
“As a general rule,“ Eric said, “19th century photographs and color work require lower light levels than black and white pictures. We aim for three to five foot-candles for 19th century prints and 20th century photos on printing-out paper, such as those by Eugene Atget or Linda Connor.”
For color prints, Eric said, they get between five to eight foot-candles. “We’ll go a bit higher—up to nine, rarely 10—for black and white prints, provided they are in good condition and don’t exhibit any staining or oxidation. Cyanotype and color Polaroids of all types get only three foot-candles, and we don’t exhibit them for more than six to eight weeks before we rotate them out and replace them with other artworks.”
Hanging Out Under the Sun
Basically, Leon said, sunlight whether direct or indirect is never a good thing for any works on paper not only because of fading but because light will heat the interior of the frame environment, creating issues that are not healthy for paper.
“Natural light,” echoed Linda, “is the most damaging to art, especially watercolors and aniline dyed textiles. Collectors should protect their art with UV or Museum glass or Museum Plexi.” And she noted, “if your home has a lot of solar gain, consider adding UV protective film on all windows.”
Whether you simply want to enjoy art on your wall or are seriously collecting as an investment, Eric advises that you take care with the lighting and display. “One good way to do that,” he suggested, “is to collect more pictures than you can have on display at one time and change them seasonally or as the mood strikes. It can be nice, for example, to see landscape pictures that are spacious and full of light during the darkness of wintertime. The other thing is that we don’t really look at our art every day; it fades into the background eventually. That’s a good time to switch things out to get a fresh view of things.”
Lighting Dos and Don'ts
- Avoid direct sunlight
- Avoid bright indirect light from windows
- Keep away from sources of heat and humidity
- The kitchen’s a lousy place for photographs
- So is the bathroom
- Rotate art seasonally
- Use UV absorbing acrylic instead of glass. It works because it contains a dye that fades over time, so it’s a good idea to replace the acrylic every two years. Or splurge and get Optium acrylic, which stays effective longer and eliminates glare/reflections.
- Mat the photos in 4-ply (or thicker) museum board. Avoid “buffered” mat board, which can damage albumen, POP, color, and cyanotype prints. Use something like Coroplast for backing, not cardboard.
- Storage: if a collector has enough photos to allow for rotations, it’s best to store photos in a cool, dry, and very dark place when they aren’t on display. Store the prints in their mats, in an acid-free storage box, with neutral interleaving paper inside the mat to protect the print from abrasion. Stand empty frames on a shelf or hang them on shelf brackets when not in use. If the sizes of the mats and frames are consistent—or at least not all over the place—you can rotate pictures into the same frames.
Handy charts for choosing the right bulbs


